 Rupert's Telescope Page
The Ramblings of an Amateur Telescope Maker
80F5 or 'BOFS'
By Rupert Powell
Friday, November 12, 2004
Updated Sunday, November 14, 2004
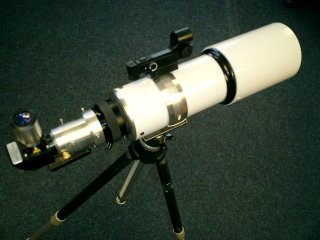
- My Home Grown 80mm F5 Refractor
Some of my early readings where in Stare Ware (by Phil harrington www.philharrington.net) an excellent starting point for any investigation into astronomy hardware. It seemed as though the choice was fairly simple; either one of the many Chinese clones, a high cost APO or something in between. The cost of these small refractors ranges from 100 - 3500. It also seemed to me that you could have just as much fun with any of them and the main point was that if they where small and light enough, and therefore transportable, they would be used far more than a larger scope. This I can testify to as my 6", GEM mounted, Newtonian spends more time keeping the garage floor down than it does under the stars.
As I have always wanted to make my own scope, and had read many web & magazine articles where people have been successful at doing so, I decided this was the course I would take. I especially liked the idea as it would allow me to pick & choose the features I liked. As well as omit the ones I didn't. Fantastic, even more fun than simply looking at what is available. As I have a small Myford lathe, and some basic workshop skills, I took the plunge and bought an objective! The project was born!
Much of the design of this scope was dictated by the materials used. This is an attempt to keep the cost down, but also I like to use up stuff I already have lying around! Many of the bits, mostly aluminium and brass, came from several visits to a local Auto jumble. These gatherings, which seem to happen up & down the country, are a great source of 'stuff' for ATMers. Most of my tube came from a regular visitor called 'Mail Order Metals'. They have a great selection of all metal, including tubing of all sizes, at reasonable prices. They also have a website where you can order most of the stuff I used in this scope. www.mailordermetals.co.uk
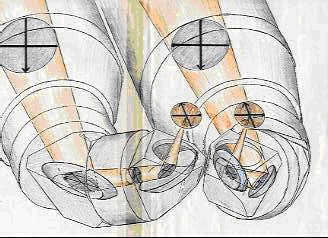
The objective lens was purchased on the web from www.surplusoptics.com for $29. It appears to be the exact same objective & plastic lens cell as is found in ALL the Chinese jobs. If you buy one the same, and you are outside the US, remember to add shipping, duty/VAT onto the cost as you will be charged this by the post man or courier on arrival. I actually bought two objectives at the same time as my ultimate intention, if phase one works out okay, is to construct a pair of binoculars using the correct image system (EMS) of Tatsuro Matsumoto see: http://www.page.sannet.ne.jp/mazmoto/index-e.htm
...however that's another day maybe!
I decided, before making the binos, I would make a travel-80F5 with the idea of taking it on holiday/vacation with me to Italy, where hopefully you can still see stars, unlike light polluted Blighty!
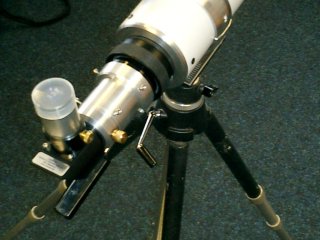
I started with the focuser, which on any scope is the most complicated bit. Of course there are many off-the-shelf R&P focusers from the far east, as well as some very nice crawford focusers, if you have more money. I however liked the look of the Borg scopes and as my primary reason for making this scope was portability, then the helical focuser used on the Borgs looked very appealing. Having never laid hands on a Borg I had no idea how their focusers worked All I could assume is that they are like camera (SLR) lenses. As I have a number of SLR lenses this set me thinking....
In my collection was a device made by Vivitar, described as a 2xMacro converter. It is designed to mount between my Olympus OM2 and the standard 50mm lens and converts it into a 100mm lens, but with the added feature of a helical extension tube. This allows the distance between lens and camera to be extended to provide very close, or macro focusing. Because of its intended purpose the amount of extension is greater than on the focusing mechanism of most SLR lenses.
The 2x lens element of the converter was easily removed with a few screws to reveal a very nice, wide aperture, helical focuser with good flanges making it easy to mount to the scope and eyepiece tubes. I would suggest looking in small ads, or ebay, for either the Vivitar job I have, or some other similar SLR extension tube adaptor. I have seen them for 20-30, and at a car boot you may find one for £1? If anyone finds a good source, let me know.
The amount of focus travel on this helical tube is less than on most R&P focusers at about 40mm, however the amount of travel required for a short tube scope (400mm) like this isn't that great, especially if you don't need to use it for terrestrial use. The finished scope does focus down to about 20m though. As a result of the helical focuser design it is very compact and doesn't have the sticky-out-bits found on most other short refractors, which are vulnerable to damage when in airline lockers etc. My 80F5 (BOFS) has none of these sticky-out-bits. (cool)
Once the focuser mountings and dimensions were known I could then draw up some dimensions for the total length of each part...see drawings...
At this point I also checked the F/L of the objective, more importantly with regard to the tube stop inside the lens cell, which takes the main tube. To do this I focused the Sun onto a piece of paper, like a schoolboy setting fire to paper in the school yard with his pocket magnifying glass! Be sure to use white paper or a fire will result. I roughly mounted lens and paper onto a piece of scrap 2x1 timber and adjusted the distance between the two until the sun was a well defined dot on the paper. I then measured the distance from the focal point to the lens stop. From this I could scale my whole design to allow focusing with my diagonal and helical focuser with some back focus for different eyepieces as well as still being able to focus on closer subjects. In truth I simply cranked the focuser until it was about half way and used this length to calculate the dimensions of the scope. As it all turned out this was about right. There is an extension tube in the design to facilitate using prime focus CCDs or an SLR, by using a longer or shorter tube, depending on the amount of back focus required. I haven't made any alternative length tubes yet, but I will as I will be using my CCD for a shot of the Moon eclipse later this month. I have made the tube easily changeable with a couple of knurled screws, the theory being that if I get them set up just right I can swap from visual to CCD without any (or very little) focus adjustment.
To be entirely on the safe side with the dimensions I opted to build the focuser and all the associated tubes and reducers before committing to cutting the main tube. I suggest you do similar to avoid wasting tube.
Once the focuser and eyepiece end were complete I once again used my 2x1 & tape to check things out, this time on the moon and without the main tube, but with everything else, including an eyepiece. This test was useful as it highlighted a slight miscalculation of the dimensions on my behalf. With a few triple checks I now knew how long the main tube should be and it was now time to cut!
I was shown a very useful technique for cutting large tubes accurately by an old colleague of mine, a method which I have used to great success many times. Simply get a piece of A4 paper and wrap it length-ways around the tube. Ensure the sides are perfectly square then tape the paper together. Then carefully slide the paper along the tube to mark where to cut. If you mount the paper on the outside of the cut, then run an indelible marker around the edge of the paper, slightly overlapping the paper onto the tube. Then slide back the paper to reveal a very precise line along which to cut. It is worth practising this and always re-measure to the marker line before you make any cuts! As the old saying goes, 'measure twice, cut once!' After cutting the tube with the hacksaw, carefully cutting up to the line, you can then remove any high-spots with a file. Be sure not to leave too much material on, outside of the line, otherwise you will have a lot of filling to do! Conversely don't stray across the line otherwise the tube will not be very square.
You should now have all the parts you require for pre-assembly, prior to baffling and painting. More importantly it shows if everything will fit together OK and that you can focus on things as expected.
The dew shield is made from 4" PVC waste pipe, which is slightly too large for the lens cell. You could, of-course, buy some suitable ali tubing of the required inside diameter, however I am a cheapskate and had the PVC pipe hanging around. As the diameter is slightly too large I made a reducer from another ring of PVC pipe cut from the same piece. I then cut a small section out of it allowing it to deform slightly and fit inside the dew shield, as shown in the diagram. This then was a snug fit onto the lens cell. If I see a suitable piece of tube at my local auto-jumble I may think about replacing the PVC to save a but of weight.
Painting the tubes instantly transforms your scope into a 'Proper Job'. The colours are up to you, I went for white (on the outside) and matt-black on the inside. Painting aluminium is a little different from PVC, where you can get away with ordinary car primer(from B&Q). To ensure the paint sticks to the ali it is necessary to use a special primer known as etching primer. (this is not a beginner's course in printing!) Etching primer is designed specially for ali and contains an acid that somehow stabilises the oxidised aluminium ensuring the subsequent coats of paint stay on. (please let me know if you know what really happens, chemistry was never my thing!) I found etching primer readily available at a local trade car paint dealer and costs around 9 for enough for 20 scopes! After priming the inside and out of the main tube with 3 light coats I masked the outside of the tube with paper and masking tape and using ordinary matt-black from B&Q painted the inside of the tube. Again I used several light coats to avoid runs. After this had dried I removed the masking tape and taped up the ends of the tube with some more masking tape. Using standard white car paint I sprayed the outside of the tube, this time with two not so heavy coats, again watching for runs. If you can be bothered to wait you can rub down between coats to get a better finish. I didn't bother as this was the last weekend prior to my holiday in Italy (Dark Skies!) and this puppy was coming along, with paint! The paint finish is great and most people comment on how professional it looks. I am sure it wouldn't stand comparison with an Astro Physics, but with a bit more practice it probably would.
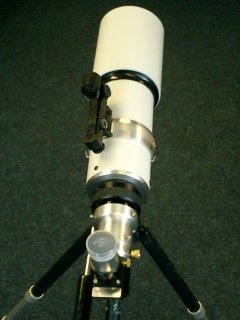
The very last thing I had to do was the mounting ring to mount it onto an old photographic tripod I had. This was done on the Tuesday night prior to my holiday; otherwise known as a 'rush-job'. I modelled my tube ring on those made by TeleVue as there is only one ring, and therefore less lathe time, which I was rapidly running out of if I were to get my scope to Italy. After sawing off a piece of tube (no measurements - it just looked like about enough!) I faced off both ends. I then turned tapers on both sides to reduce the overall weight of the ring (which is why I assume TeleVue have done it?). Then I sawed the ring into two halves with a hacksaw and finished off the two flat surfaces with a file. I then, very carefully, marked out for the holes which would be used to hold the two halves together. I first drilled the holes from the flat side, approaching the work at 90 degrees. The drill emerged from the work at a tangent to the ring. The hole to take the end of the clamping screw was not drilled through and was tapped blind using an M3 end tap. In order for the head of the screw to sink into the tube and contact a flat surface (to tighten against) I used a counter-boring tool which is guided by the M4 clearance hole made for the clamping screw. These tools produce excellent results. Even in a drilling machine you can get a really good finish. I am sure you could knock up your own using an old drill bit and grinder - certainly worth a go! I bought mine from the local auto-jumble for 2.
After the clamping screws were in place I milled a flat on the bottom side of the tube ring and screwed that to a flat ali plate. The plate had a 1/4" Whitworth hole put in it to take a tripod screw, prior to screwing it onto the tube ring with a couple of M3s. They were also counter-bored flush with the aforementioned tool (cool!). In hindsight I should have bored off a mil or two from the inside of the tube ring as when I lined the ring with black felt (from Dunelm - 99p per A4 sheet) using Scotch spray mount, it was all too tight on the main tube. In the end I removed the felt. So the ring has marked the tube slightly....so what! I also would like some clamping screws that do not require an allen key, as mine do. TeleVue have a cool looking swivel screw, whereas others (TMB & Stellarview) have knurled knobs to get hold of, so to speak! Someday I may re-make the tube ring, but for now it works fine.
First light was the night before my trip to Italy. My light-polluted suburban garden isn't the best place, however the little scope performed better than expected and my first view through it summoned a WOW! I didn't get to see too much as my wife felt that packing for my holiday was a priority over star testing my new scope. I went to bed with an image of the Andromeda Galaxy in my mind that left me very excited about trying this scope from a dark Tuscan mountain-top. It turned out I wouldn't be disappointed! If you have a few weekends free, a lathe and an understanding wife, as I do, you too will not be disappointed!
This little scope now goes with me most places - even on the plane as hand luggage.
Next is a decent Alt-Az mount for it and internal baffles...watch this space!